Views: 0 Author: Site Editor Publish Time: 2026-04-25 Origin: Site


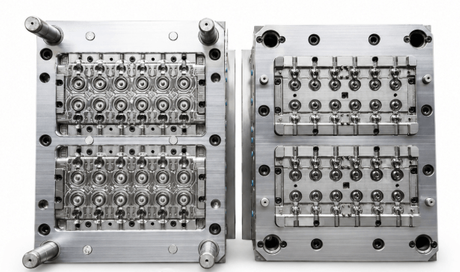
The production of plastic water bottle caps is a high-speed, high-precision manufacturing process that demands absolute consistency. Within this environment, the injection mould is the most critical asset, directly influencing the quality of the final product and the overall efficiency of the production line. However, the continuous mechanical stress, high temperatures, and chemical exposure inherent in injection molding can lead to gradual degradation. Proper maintenance is not merely a cleaning task; it is a comprehensive strategic approach to ensuring that every Caps Mold Components operates within its designed tolerance for millions of cycles.
Maintaining a water bottle cap mould requires a rigorous regimen of regular cleaning, precise lubrication of moving parts, frequent inspection of critical components like cores and cavities, and strict control over environmental factors such as temperature and storage conditions. By implementing a proactive maintenance schedule, manufacturers can prevent flash, short shots, and dimensional inaccuracies while significantly extending the service life of the tooling.
Neglecting these maintenance protocols often leads to catastrophic tool failure, resulting in expensive repairs and unplanned production downtime. This article provides a comprehensive guide on the technical requirements for preserving cap moulds, focusing on the longevity of Caps Mold Components and the optimization of high-volume production cycles.
Regular Cleaning
Inspection for Wear and Tear
Lubrication
Temperature Control
Storage
Training for Operators
Upgrading and Modernization
Importance of Quality Moulds

Regular cleaning involves the systematic removal of plastic residue, outgassing deposits, and environmental contaminants from the mould surface and venting channels to maintain part clarity and prevent venting issues.
The primary objective of regular cleaning is to combat the buildup of "plate-out." During the injection process, volatile organic compounds and additives within the plastic resin release gases. If these gases are not effectively cleared, they condense on the cool surface of the Caps Mold Components, creating a thin film that can cause cloudiness on the caps or block the microscopic venting paths. Blocked vents lead to "burn marks" or "short shots" because the air inside the cavity cannot escape as the melt enters.
A professional cleaning protocol should be performed at the end of every shift or after a specific number of cycles. Operators should use specialized solvent-based cleaners that evaporate quickly without leaving a residue. It is vital to use soft, lint-free cloths or non-abrasive tools to wipe the polished surfaces. Using hard metal scrapers is strictly forbidden, as even a microscopic scratch on a mirror-finish cavity will be replicated on every single plastic cap produced thereafter.
Deep cleaning requires the mould to be taken to a bench where ultrasonic cleaning or dry-ice blasting can be utilized. Dry-ice blasting is particularly effective for Caps Mold Components because it is non-abrasive and leaves no secondary waste. This process reaches deep into the cooling lines and intricate threads of the cap mould, ensuring that the heat transfer remains uniform across the entire tool surface.
Frequent inspection for wear and tear is the process of visually and mechanically checking parting lines, gates, and moving pins to identify erosion or fatigue before they cause dimensional deviations in the finished caps.
Continuous high-pressure injection causes erosion, particularly at the gate area where the molten plastic enters the cavity at high velocity. Over time, the sharp edges of the gate may round off, leading to "gate vestige" issues or difficulty in degating. Inspection routines must include the use of magnifying tools or profilometers to check the integrity of these critical transition points. If the Caps Mold Components show signs of pitting or "washout," they must be scheduled for laser welding or replacement immediately.
The parting line is another high-vulnerability zone. When the mould halves clamp together under hundreds of tons of pressure, any microscopic debris trapped between the faces can cause "hobbing" or permanent indentation of the steel. During inspection, technicians must look for signs of "flash" on the produced parts, which is a clear indicator that the parting surfaces are no longer sealing perfectly. Checking the alignment of leader pins and bushings is also essential to ensure the two halves meet with absolute precision every time.
Furthermore, internal components such as ejector pins and return pins must be checked for straightness and surface scoring. In high-cavitation water bottle cap moulds, a single bent ejector pin can stall the entire production line. Regular measurement of the Caps Mold Components ensures that the critical dimensions of the cap, such as the tamper-evident band and the internal thread pitch, remain within the tight tolerances required for a leak-proof seal on the bottle.
Lubrication is the strategic application of specialized, high-temperature greases to all sliding surfaces, such as ejector plates, slides, and lifters, to minimize friction and prevent mechanical seizing.
In the fast-paced cycle of cap production, moving parts experience significant thermal and mechanical stress. Without a consistent film of lubricant, metal-on-metal contact leads to galling, where the surfaces essentially weld together and tear apart. This is particularly dangerous for Caps Mold Components like collapsing cores or unscrewing mechanisms used for threaded caps. A failure in lubrication here can lead to a complete "lock-up" of the tool, requiring an expensive and time-consuming overhaul.
Selecting the correct lubricant is a technical decision. Since many water bottle caps are used in the food and beverage industry, food-grade lubricants (NSF H1 rated) are often mandatory to prevent contamination. These lubricants must be stable at high operating temperatures and resistant to "bleeding," which is when the oil separates from the grease and migrates into the mould cavity, causing grease marks on the plastic caps.
The application must be precise. Over-lubrication is just as detrimental as under-lubrication, as excess grease attracts dust and plastic fines, creating an abrasive paste that accelerates wear. Maintenance logs should track the frequency and type of lubricant applied to specific Caps Mold Components. Automated lubrication systems are increasingly common in high-volume environments to ensure that the exact required volume is delivered to the slides at every cycle.
Temperature control involves monitoring and maintaining the cooling water circuits and heaters to ensure the mould operates at a stable thermal equilibrium, which is vital for part consistency and stress prevention.
Plastic injection molding is essentially a heat transfer process. To produce a water bottle cap, the mould must quickly absorb the heat from the molten resin so it can solidify and be ejected. If the cooling channels within the Caps Mold Components become clogged with scale or rust, the heat transfer efficiency drops. This results in "hot spots," causing the caps to warp or shrink unevenly, which directly compromises the seal integrity of the final beverage package.
To maintain the cooling system, the water quality must be strictly controlled. Using filtered, deionized water with rust inhibitors prevents the internal corrosion of the cooling galleries. Periodic "acid flushing" or descaling of the mould's internal circuits is necessary to remove calcium deposits that act as insulators. Maintaining a consistent temperature across all cavities in a 48- or 96-cavity tool is the only way to ensure that the caps produced in cavity 1 are identical to those in cavity 96.
Thermal stress is another factor. Rapidly heating or cooling a mould can cause the steel to crack, a phenomenon known as "heat checking." Maintenance procedures should dictate a gradual warm-up period for the tool before high-speed production begins. Monitoring the thermocouples and heater bands within the hot runner system is also a part of this maintenance pillar, ensuring that the Caps Mold Components are not subjected to localized overheating that could degrade the steel's hardness.
Storage protocols involve the cleaning, rust-proofing, and secure housing of the mould in a climate-controlled environment when it is not in active production to prevent atmospheric corrosion.
When a production run is complete, the mould cannot simply be pulled from the press and left on the factory floor. Residual moisture from the cooling lines or humidity in the air can cause rust to form on the precision-machined surfaces within hours. The first step of storage is to purge all water from the cooling channels using compressed air. If water remains trapped inside, it will lead to internal oxidation that is almost impossible to remove without dismantling the entire assembly of Caps Mold Components.
After purging, the internal cavities and parting lines must be coated with a high-quality rust preventative spray. This creates a protective barrier against oxygen and moisture. The mould should then be closed "on a low-pressure clamp" to protect the parting surfaces from dust and accidental impacts. For long-term storage, the tool should be moved to a dedicated rack in a dry, temperature-controlled warehouse, away from the corrosive fumes often found in manufacturing plants.
Proper labeling is a critical but often overlooked aspect of storage. Each mould should have a "status tag" indicating its current condition (e.g., "Ready for Production," "Needs Repair," or "Cleaned and Greased"). This prevents the accidental installation of a damaged tool. Regular audits of the stored Caps Mold Components should be conducted to ensure the rust preventative remains intact and that no leaks have occurred in the storage area.
Training for operators focuses on teaching the production staff how to handle the mould safely, recognize early warning signs of tool wear, and perform basic daily maintenance without damaging sensitive surfaces.
The machine operator is the first line of defense in mould maintenance. They are the ones who observe the machine for 8 to 12 hours a day and are most likely to notice the subtle changes that precede a failure. Training should include "visual literacy"—teaching operators to spot the difference between a healthy part and one showing signs of flash, dragging, or contamination. When an operator can identify that a specific Caps Mold Components is starting to fail, they can trigger a maintenance check before the problem escalates.
Specific "Do's and Don'ts" must be reinforced. For example, operators must understand that they should never use a screwdriver or metal pliers to clear a stuck part from a cavity. Instead, they should use brass or plastic tools that are softer than the mould steel. They should also be trained in the correct start-up and shut-down procedures, ensuring that the mould is not clamped with excessive force, which can "crush" the parting lines and damage the Caps Mold Components.
Furthermore, training should cover the importance of documentation. Every time a mould is cleaned or lubricated on the press, it should be recorded. This data allows maintenance managers to identify patterns; for instance, if a specific tool requires cleaning more frequently than others, it may indicate a problem with the resin quality or the hot runner calibration. Empowering operators with this knowledge creates a culture of "Total Productive Maintenance" (TPM).
Upgrading and modernization involve the periodic replacement of standard parts with advanced components featuring superior coatings or materials to improve the mould's durability and cycle efficiency.
As technology advances, the materials used for Caps Mold Components also evolve. Modernization might involve replacing standard steel ejector pins with pins that have a Diamond-Like Carbon (DLC) coating. These coatings drastically reduce friction, allowing the mould to run faster and with less lubrication. For a high-speed water bottle cap line, reducing the cycle time by even 0.5 seconds through better component performance can result in millions of additional parts produced per year.
Another aspect of modernization is the integration of "smart" sensors. Mold-mounted cycle counters and pressure sensors can provide real-time data to a central maintenance system. These sensors track the actual work the tool has performed, allowing for "predictive maintenance" rather than just "preventative maintenance." Instead of servicing the tool every month, you service it exactly when the data indicates that the Caps Mold Components are reaching their fatigue limit.
Finally, upgrading the cooling system can provide significant benefits. Newer "conformal cooling" inserts, created through 3D metal printing, allow cooling channels to follow the exact contour of the cap cavity. This provides much more uniform cooling than traditional drilled holes. By upgrading older tools with these modern inserts, manufacturers can breathe new life into existing assets, improving part quality and reducing the thermal stress that leads to long-term mould degradation.
Investing in high-quality moulds made from premium steels and precision-engineered components is the most effective way to reduce the overall maintenance burden and ensure long-term production stability.
A common mistake in B2B procurement is focusing solely on the initial purchase price of the tooling. However, a "cheap" mould often uses lower-grade steel that is more susceptible to corrosion, wear, and thermal fatigue. In contrast, a high-quality mould utilizes specialized tool steels (like S136 or H13) that have been properly heat-treated to the correct Rockwell hardness. These superior Caps Mold Components maintain their dimensions and surface finish for millions of cycles, requiring significantly less "emergency" maintenance.
Feature | High-Quality Tooling | Budget-Level Tooling |
Steel Grade | High-Chrome Stainless (S136) | Standard P20 or Carbon Steel |
Surface Finish | Mirror Polish (A1 Grade) | Standard Machined or Low Polish |
Component Tolerance | ± 0.002mm | ± 0.01mm |
Maintenance Frequency | Low (Scheduled) | High (Reactive) |
Expected Cycle Life | 5 Million+ | < 1 Million |
Quality extends to the engineering of the Caps Mold Components themselves. Precision-fit components ensure that there is no "play" or vibration during the high-speed movement of the press. This lack of vibration prevents premature wear on the leader pins and bushings. When the internal components are manufactured to exacting standards, the risk of part hang-ups or mechanical interference is virtually eliminated, allowing the maintenance team to focus on optimization rather than constant fire-fighting.
Ultimately, the goal of maintaining a water bottle cap mould is to achieve the lowest possible "cost per part." While high-quality moulds and rigorous maintenance schedules require an upfront investment, they pay for themselves by providing uninterrupted production, minimal scrap rates, and a tool life that spans a decade or more.